$10 Arduino Beatbox (remake of the $5
Picaxe Drum machine)
(click images for
better view)
Introduction:
This is my first real Arduino project. It comes after building a
handful of Picaxe projects over
several years. Both platforms are nice, but all things being
equal, the Arduino is more open and hence, offers more freedom.
I'm sure that there are some good comparisons of these devices on the
net, but since you're already here, you can read
my impression of the differences.
Description:
This is a simple sequencer machine which uses Capacitative Sensing Code
for input to the Arduino. It is is a combination drumpad and
sequencer. It has just two modes, record, and playback, and needs
very few components; an Arduino (of course), and just 3 resistors and a
piezo speaker. If you're feeling decadent, you can add an LED
(with a resistor) for more "ooomph".
I have a $5 version of
this which runs on a PICAXE microcontroller. As you can see
from the project enhancements, moving
to an Arduino is a nice change since it offers much more potential with
far faster processing, much more memory, and a nice
variant of C which is closer to the high-level object oriented
languages that I like. But I can't give up on the Picaxe
either.
It offers unparalled simplicity, lower cost, and lower power
requirements. In fact, my picaxe projects never needed a
power-switch since they could go to sleep and wake up entirely under
software control. It is just a matter of time before this level
of
power conservation comes to the Arduino, but its not quite a nanowatt
microcontroller yet.
Basic function:
When the program starts, it expects the sensing buttons to be
untouched, and needs a fraction of a second to calibrate a good
value to distinguish between touched and untouched. It then beeps
a high pitch beep to indicate the start of the record sequence.
At this pont, the user taps a rhythm on any of the 3 pads:
low, medium, and high pitch tones. When finished, tap one final
time
to indicate when the drum-loop should repeat.
After the recording is finished, the Arduino removes the trailing
silences, and applies a modified median filter to clean up the
recorded track. Capacitive sensing buttons have noise like
you wouldn't believe, making real-time input a bit challenging.
Then playback looping begins. Your track is repeated ad
infinitum, in all its glory. Touching one of the buttons at the
end of
a loop resets the device and enters record mode.
This program contains some good generic code. The capacitive
sensor routines senses a finger touching a wire attached to a
pin.
It needs only a 1M ohm resistor, so using this as a UI is cheaper and
easier than buying buttons! And Paul Badgers tone generation
routine is essential knowledge for those who wish to beep.
My capacitive sensing code is based on Paul Badgers code, but should be
easier to read since I don't know the Arduino particularly well!
I wouldn't have used his routines, but using external
libraries with the Arduino software is kind of a hassle. I like
very
portable code, and will stick with my stand-alone routines until the
Arduino IDE has a mechanism for importing external libraries nicely.
The IDE is ok, but compared to OOP methods using Netbeans and Java,
embedded programming still has a little way to go.
Power is supplied by a wall wart through the onboard
Arduino voltage regulator, or through the USB bus if you have the
programming header connected.
Parts List:
Arduino microcontroller (I used Moderdevice.com's RBBB
kit)
1M resistor (3)
Piezo speaker
some misc hardware
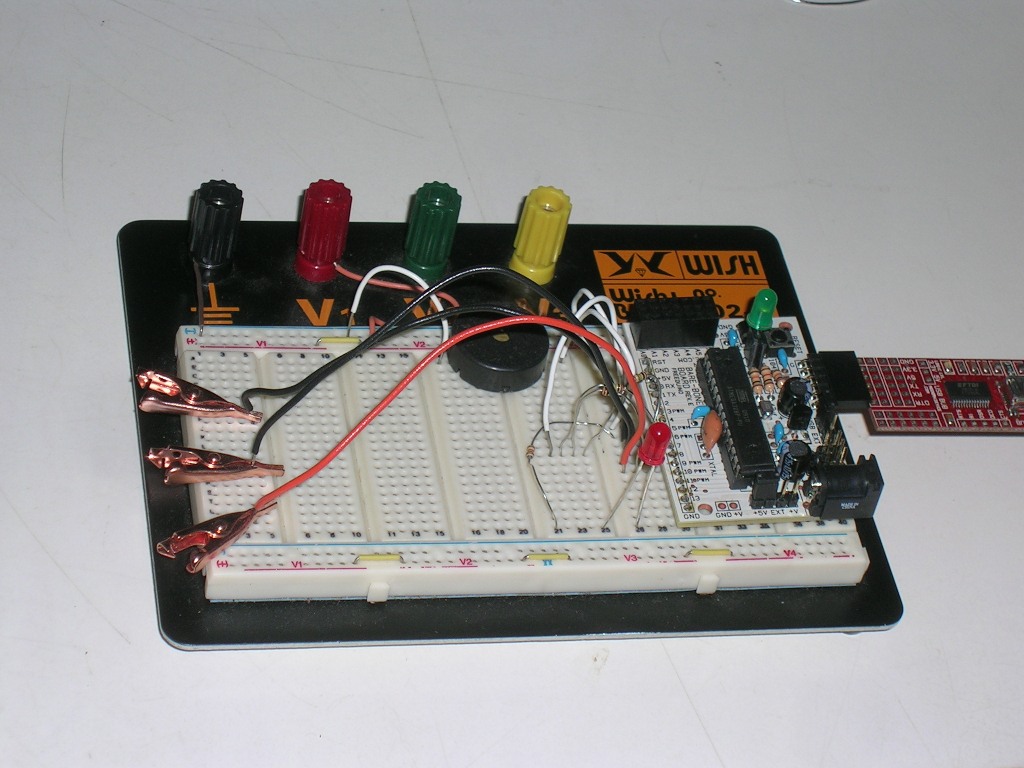
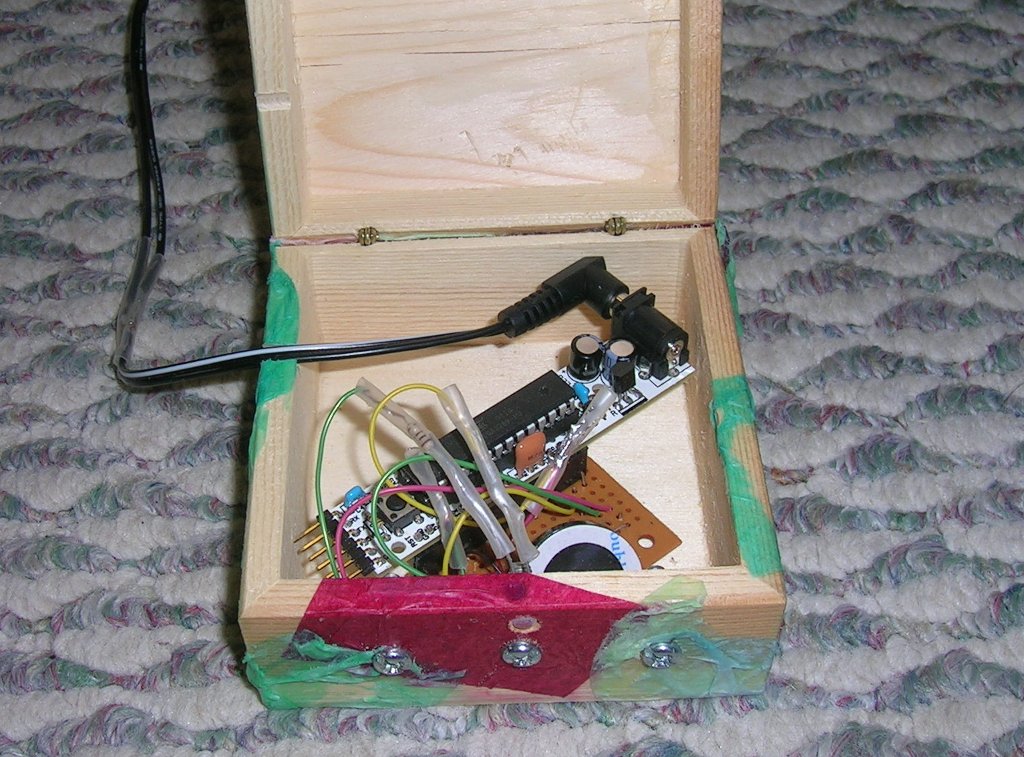
Assembly:
The schematic
of this project is pretty darn simple. I first assembled it on a
prototype. Its worth having a
a dedicated Arduino on a solderless breadboard so you can quickly
wire-up anything you wish. I then mounted it in a craft box that
was predecordated with tissue-paper and pictures. The RBBB
Arduino just fits inside. 3 small sheet metal screws stick out of
the front of the box and provide the touch pad surface on which the
user taps. There's also an LED. This was of the clear
variety which was difficult to see, so I roughed it up with sandpaper
which converts it nicely to a diffuse LED.
The software
is fairly straightforward. Since I worked out the interface previously,
it was pretty easy to code up. And after programming on a Picaxe
for a while, the richness of the Arduino makes you wonder if there is
anything that you can't do.
Write me if
you find this project interesting. Link to this page if you find it
relevant.
Warning, warmly greet new renewably powered interactive
autonomous electromechanical overlords. This project is provided
without any warranty and probably isn't suitable for anything.